Phase 1 - Customer enrollment
Approximate time to completion: Less than 5 minutes
The onboarding process begins with a business or non-profit enrolling in Autobooks through your online banking site or mobile application (if available through your mobile app).
User clicks on Autobooks or an Autobooks payment module within online banking.
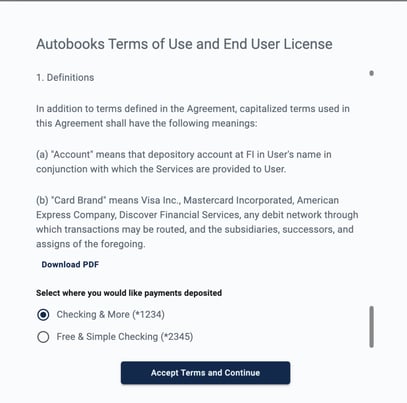
User reads and accepts Autobooks Terms & Conditions then selects a checking account for Autobooks deposits and fee withdrawals (if the user has multiple checking accounts for their business).
NOTE: Autobooks can be connected to only one checking account. Autobooks cannot be connected to other account types.
Business/organization data is sent to Autobooks from the financial institution once Terms have been accepted. This data is used to determine what questions we ask during the next phase of onboarding.
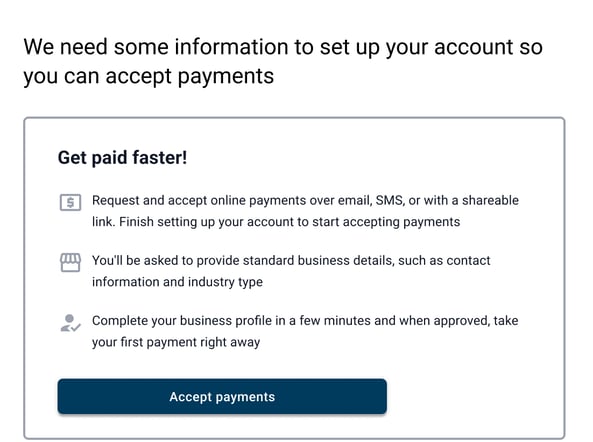
The user is now within our application. They can choose to proceed to Phase 2 to apply to accept digital payments or skip Phase 2 for now to explore our tools.
NOTE: The business/organization cannot process a payment until they complete Phase 2. Our application will prompt the user to complete Phase 2 wherever they can take action to get paid (ex: sending an invoice or sharing their payment link). We will also display an in-app notification.

Approximate time to completion: 5 - 15 minutes (may vary, dependent on number of questions).
During this phase, Autobooks will gather data from the user about their business/organization and themselves by displaying questions. The questions displayed are dependent on the data we receive from your financial institution once the user has accepted our terms and conditions. We will not ask a question in which we already know the answer, so the number of questions we display in this phase will vary from user to user.
The customer will select Accept Payments from within the application. NOTE: This may occur either within the Get Paid Faster modal shown in at the end of Phase 1 OR in various locations throughout the application.
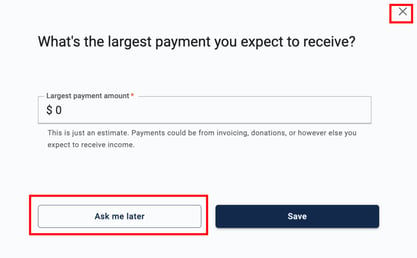
The user will answer questions displayed. If they want to defer any particular question in the moment they can, but all questions MUST be answered before Autobooks can approve the business/organization to take payments through our tools.
Deferred questions
If the user defers a question, it will appear at the end of the question process flow. No question can be completely skipped.
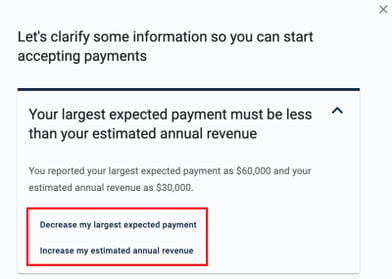
Questions with answers that conflict with logic rules
We may ask the user to clarify answers if the answer conflicts with other business/organization data.
The user will select the way they wish to clarify their answer. We will re-display the question that conflicted with our rules logic for them to change their answer. If the new answer still conflicts (or creates a new conflict) we will ask them to re-clarify until the rules logic is satisfied.
Note: if the user closes the questions window or exits Autobooks during this phase, their progress is saved. Autobooks will email the customer to notify them their application to process payments is still incomplete, and prompt them to return to Autobooks. Click here to view email samples (Initial Awareness > Additional Information Needed). We will also display a notification in-app to prompt the user to take action.
Once all questions are answered, the data is run through our automated underwriting process. Credit/debit card payments and ACH (bank transfer) payment approvals are issued separately. Because of this, some businesses may be approved more quickly for one payment type versus the other.
Our automated underwriting process will check the data for potential red flags and deem the business/organization as High Risk or Low Risk.
- If deemed Low Risk, the business/organization will be auto-approved to process payments.
- If High Risk, the applicant will be flagged for manual review (see Phase 3).
If approved, the business/organization will receive two email notifications of approval: one to notify them that they are now able to process credit/debit card payments and another to notify them they are now able to process ACH (bank transfer) payments. Approval email samples are here in the Initial Awareness > Enabled to Accept Payments section.
- Identity validation/business validity check.
- The applicant does not have a negative financial history (active liens, judgements, negative bank balances, etc.).
- The business is not a prohibited business type. Click here to see a list of prohibited business types.
Note: Autobooks does NOT do a hard credit pull on the applicant.
Autobooks MAY deny the applicant after these initial validations. If so, Autobooks will send the applicant an email notification of the decision.

 As the applicant responds to items in the list, a green checkmark will appear to indicate the specific requested information has been received.
 - If approved, the applicant will receive an email notification of their approval and messages will appear in our application. Their status in the Autobooks Hub will be Approved.
- If denied, the applicant will receive an email notification of the denial and messages will appear in our application. Their status in the Autobooks Hub will be Denied.
- If more information is still needed, we will repeat Step 2 above until resolved.
Note: Autobooks will display the current payment approval status within our application to the business/organization throughout the approval process. Click here to learn more about our in-app messaging.
There are additional steps for a business/organization when enabling Tap to Pay. These steps will be displayed to the user within Tap to Pay after they are approved to process payments.
The user will connect an Apple ID to Tap to Pay. The user can choose to connect the Apple ID that is currently associated with the device they are using in the moment OR use an Apple ID from another device. NOTE: The user should have their Apple ID user name and password handy.
While the Apple ID connection is being established with Apple, the user will view a short tutorial video on best practices in taking a payment through Tap to Pay.
NOTE: This step may take anywhere from 30 seconds to 2 minutes. The customer should NOT click out of the application while the connection is being established.
The Apple ID connection is complete and the user can begin taking payments through Tap to Pay.
The user will be initially enrolled in our Essentials plan, which includes our all of our payment processing tools. Click here to learn how a user can change or upgrade their plan type.