
The Action Center is where your loan operations team works on every business and consumer loan after the borrower submits it. You complete each action step in order, and the loan then moves to the Activity Archive until further action is needed.
The Action Center
The Action Center is located by opening Program Maintenance, then Action Center. Select business or consumer products from the upper filter to see loans for that product type, then toggle the filters to adjust the view for the tasks you specifically work on.
Best Practice: Check the Action Center every business day for new loans, renewals and credit monitoring alerts.
| Icon | Meaning |
|---|---|
| Plus symbol | A new loan to book |
| Renewal icon | A renewal waiting for action |
| Refresh | Reloads the queue after you finish work |
What a loan record shows
A loan record works as your boarding sheet for a new loan. Required actions for the loan are defined in the Action Steps area. The rest of the record shows the loan summary: amount, term, rate, APR, geocoding for CRA reporting, the borrower's choices, the signed disclosure documents and a time-stamped event log.
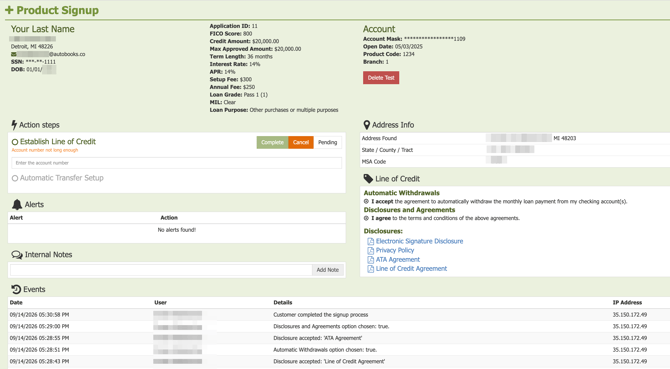
Business loans: The summary also shows guarantor details, business name and address, form of business and collateral.
Consumer loans: The summary also shows the borrower's home address, credit score, the monitored checking account and military status.
Each action in the Action Steps stays locked until the step before it is complete. Each step has Complete, Pending and Cancel buttons. All actions performed are recorded in the Events log (who completed each step and when).
To open and view a new loan
- Click Program Maintenance.
- Click Action Center.
- Set your business or consumer product filter.
- Click a loan record marked with a plus symbol.
The record opens with the action steps required to complete booking the loan.
To book a loan
Consumer loans
- Check the home address. If the customer entered an address that is different than your internal system, it will show in red. Verify the address and update your internal system as needed before you continue.
- Set up the line of credit or term loan in your internal system with the product code set during implementation, using the details shown onscreen.
Note: your financial institution may set up the loan automatically via your integration. In that case, simply verify the data in the Action Center matches the data in your system. - In the Action Steps, enter the loan account number issued by your system (this may already be populated for you). Click Complete when done, or click Pending if your process requires loan review first. If there is an issue and the loan must be canceled, click the Cancel button.
- The Automatic Transfer Setup step connects the borrower's checking account to the loan for automatic payments. Click Complete to finish this connection. (Note: this step will appear only if your borrower has opted for automatic loan payments from their checking account.)
- The loan will now appear in the Activity Archive.
Business loans
- If your financial institution requires it, the Business Verification step will appear first in the Action Steps. Call the business at the phone number in your core system and verify the business owner intended to apply for the loan. Once verified, click Complete. (business loans only)
- If your institution uses our lien filing service, you'll see a UCC-1 step in the Action Steps. Clicking Complete sends the filing to the connected service. If you file manually, finish your filing first. (business loans only).
- If your institution requires it, a NAICS code step appears. Verify and enter the NAICS code for the business type, then click Complete. (business loans only)
- Set up the line of credit or term loan in your internal system with the product code set during implementation, using the details shown on screen.
Note: your financial institution may set up the loan automatically via your integration. In that case, simply verify the data in the Action Center matches the data in your system. - In the Action Steps, enter the loan account number issued by your system (this may already be populated for you). Click Complete when done, or click Pending if your process requires loan review first. If there is an issue and the loan must be canceled, click the Cancel button.
- The Automatic Transfer Setup step connects the business checking account to the loan for automatic payments. Click Complete to finish this connection.
- The loan will now appear in the Activity Archive.
Note: Pending and Cancel buttons ask for a reason, and that reason is emailed to your borrower. Use Pending when you are waiting on something, such as a return phone call.
Use the internal note field to leave status for a colleague, such as a message left during the verification call.
For Lines of Credit only: Once you've performed all Action Steps, turn on the line of credit in your online and mobile banking platforms so your borrower can take draws. This happens within your own systems.
To stop a loan instead, see Cancel a loan application.